Use the SAML Service Provider Metadata XML file provided by Swank to import our configuration into your SAML Provider. You can download the file here.
Step 1 – Configure Azure AD Enterprise Application
Create Enterprise Application
- Sign into the Azure Portal
- Navigate to Enterprise Applications
- Select New Application
- If you do not see "Non-gallery application" and do see this prompt:
Click the prompt to switch back to the old gallery experience.
- If you do not see "Non-gallery application" and do see this prompt:
- Select Non-gallery application
- Enter your application name ( “digitalcampus.swankmp.net” ) and Click Add.
- On Properties, Select “Set up Single sign on”
- Select SAML
- Select Upload metadata file
- Use the Digital Campus ServiceProviderMetadata.xml file which can be downloaded from here then click Add. (Note: This can only be used for one instance of a Swank streaming portal as Entra requires a unique Entity ID) This imports the following:
- Identifier (Entity ID)
- Reply URL (Assertion Consumer Service URL)
- Logout Url
- SAML Signing Certificates
- Confirm Basic Settings
- Edit SAML Signing Certificate and change Signing Option to “Sign SAML response and assertion”.
- Download Federation Metadata XML File. This file will be used in the SAML setup of Digital Campus Portal
- Click Save.
Assign Application Access
- Select Users and Groups add Test Users or Groups
- Select appropriate users and click Assign. These will be authorized users for the application.
Configure Attributes & Claims
- Select Single sign-on.
- Click the Edit button for "Attributes & Claims".
-
Required SAML attributes follow but should be renamed to the urn:oid standard. Renaming the attributes to the urn:oid standard will allow the Swank streaming portal to identify the attribute and auto populate these required fields for instructor/admin accounts.
- user.givenname --> urn:oid:2.5.4.42
- user.surname--> urn:oid:2.5.4.4
- user.mail --> urn:oid:0.9.2342.19200300.100.1.3
-
When renaming in Azure, the urn:oid should go in the Name field and the Namespace should be left blank as shown here:
-
Required SAML attributes follow but should be renamed to the urn:oid standard. Renaming the attributes to the urn:oid standard will allow the Swank streaming portal to identify the attribute and auto populate these required fields for instructor/admin accounts.
Add a Group Claim
You may want to return a group claim to help you identify a specific user group that will need an elevated role on the streaming portal. Steps below provide basic guidance, but please refer to Microsoft documentation/support for the most up to date information.
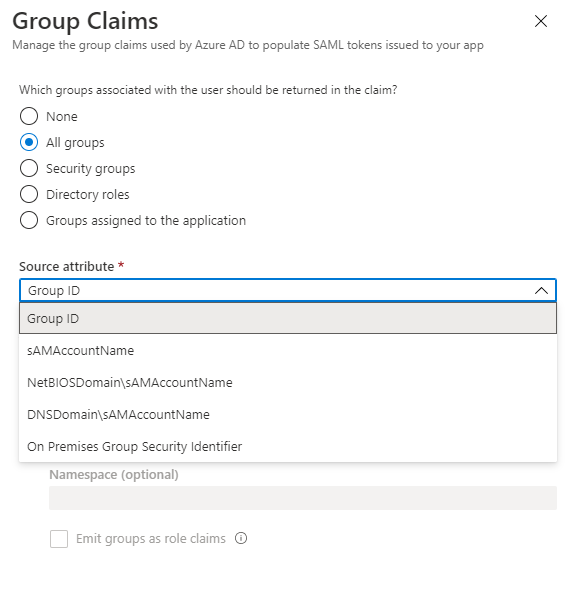
- Click "Add a group claim"
- From here, select Groups assigned to the application to send any groups the authenticating user belongs to that are assigned to the application.
- You can then select the appropriate Source Attribute value to return (Group ID, sAMAccountName, etc.)
- Note: sAMAccountName - This source attribute only works for groups synchronized from an on-premises Active Directory using Microsoft Entra Connect Sync 1.2.70.0 or above.

- You can then select the appropriate Source Attribute value to return (Group ID, sAMAccountName, etc.)
- Then click Save.
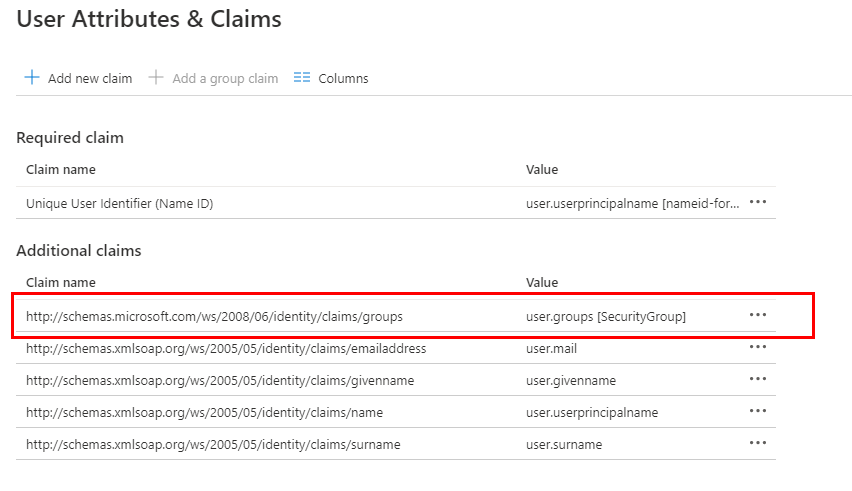
- The Group values should return with this attribute name:
- "http://schemas.microsoft.com/ws/2008/06/identity/claims/groups"

- The Id returned is the Object Id of the Group defined in Azure AD:
Step 2 – Configure Digital Campus SAML Authentication
- Refer to the following article to continue setup in the Swank Cloud Streaming Admin:
Configuring Swank Cloud Streaming SAML Authentication
If you are having issues authenticating after your configuration is complete, please refer to the following guide: Cloud Streaming - Azure SAML V2 Troubleshooting – Swank Motion Pictures, Inc.


Comments
0 comments
Article is closed for comments.